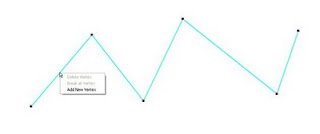
The Vertex Edit commands can be very useful when editing redline element such as Lines and Shapes that have vertex points defining their geometries. By using the Select command, a redline element can be selected for edit (it changes to the highlight color and the vertex nodes are shown with handles). The user has always been able to click on a vertex handle and drag the version to a new location. With the new vertex commands, the user can now perform three more types of edits.
Add New Vertex
To add a new Vertex to a Line or Shape, select the element, then right click on the spot to insert the new vertex. When the right click is pressed, a menu will display with the available options. The Add New Vertex option can be selected:

Once the new vertex is added, a new vertex handle will display:

The new Vertex can be moved around just like any other vertex in the selected element:

Delete Vertex
If you right-click the mouse on one of the vertex handles, you will get different options. The Delete Vertex and Break at Vertex option will be enabled. If you select Delete Vertex, the selected vertex will be deleted:

The deleted vertex is removed and the geometry of the element is updated to reflect the change:
The Break at Vertex option is new to both GTVx and GTViewer. By right-clicking on a vertex, the Break at Vertex option will be available on the menu.


No comments:
Post a Comment